# SQL Server
1. Login to `WEB01` as the `Administrator` user with password `Welcome01!`.
2. Download SQL Server 2019 from [Microsoft Evaluation Center](https://www.microsoft.com/en-us/evalcenter/evaluate-sql-server-2019).
3\. When smartscreen comes up select "Run".
{% hint style="info" %}
The SQL Server Installation may require internet access, temporally add a second adapter in the machine settings and select the NAT network. The machine should have internet access. (ps our first adapter is different since our lab runs on a ESXI host).

{% endhint %}
4\. On "Select an installation type" select "Basic":

5\. Accept the License Terms and click "Install".

6\. Once the installation is finished, click on "Customize".

7\. Check "Use Microsoft Update to check for updates" and click next till the step "License Terms" and accept them:

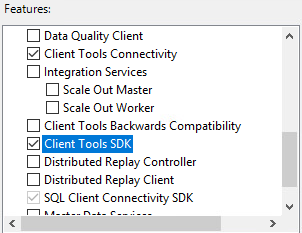
8\. At the step "Feature Selection" choose the following options:
* Database ENgine Services
* SQL Server Replication
* Client Tools Connectivity
* Client Tools SDK

9\. Click Next and fill in the Instance name `dev`.

10\. Change the "Startup Type" for the "SQL Serer Agent" to "Automatic" and make sure all three are set to "Automatic", click "Next".

11\. At the next step select "Mixed Mode" and fill in the password `Password1!`. Then select "Add" at the "Specify SQL Server administrators" and add `amsterdam\administrator` then click Next.

12\. Click "Install" and wait for the installation to finish.

13\. Open the "SQL Configuration Manager".

13\. Expand "SQL Server Network Configuration" and select "Protocols for DEV". Double click on "TCP/IP" and select the "IP Addresses" tab. Fill in `1433` for "TCP Port".
14\. Scroll to the bottom and also configure IPAll:
14\. Then click "Apply".
15\. Open "SQL Server services" and right click on "SQL Server (DEV)" and click "Restart".

16\. Do the same for "SQL Server Agent":
17\. Download and Install [SQL Server Mangement Studio](https://docs.microsoft.com/en-us/sql/ssms/download-sql-server-management-studio-ssms?redirectedfrom=MSDN\&view=sql-server-ver15). Just Click "Install" and reboot the system.
### Configuring Windows Firewall for SQL Server
1. Search for "Windows Defender Firewall with Advanced Security" and select "Windows Defender Firewall with Advanced Security"
2\. Rightclick on "Inbound Rules" and select "New rule".
3\. Select "Port" and click "Next"
4\. Make sure "TCP" is selected and fill in port `1433` and click "Next":
5\. Click next at the step "Profile". Fill in the name "Allow TCP 1433 MSSQL Server for all" and click "Finish":
6\. When done remove the "NAT" adapter from the virtual machine.
### Testing connectivity
1\. Open the Kali machine and run a quick Nmap to check if the port is open:
```
sudo nmap -p 1433 10.0.0.5 -Pn -n
Starting Nmap 7.92 ( https://nmap.org ) at 2022-03-06 11:39 CET
Nmap scan report for 10.0.0.5
Host is up (0.017s latency).
PORT STATE SERVICE
1433/tcp open ms-sql-s
Nmap done: 1 IP address (1 host up) scanned in 0.12 seconds
```
---
# Agent Instructions: Querying This Documentation
If you need additional information that is not directly available in this page, you can query the documentation dynamically by asking a question.
Perform an HTTP GET request on the current page URL with the `ask` query parameter:
```
GET https://ad-lab.gitbook.io/building-a-windows-ad-lab/lab-setup/building-the-lab/creating-bank.local/creating-amsterdam.bank.local/creating-webserver-web01/sql-server.md?ask=
```
The question should be specific, self-contained, and written in natural language.
The response will contain a direct answer to the question and relevant excerpts and sources from the documentation.
Use this mechanism when the answer is not explicitly present in the current page, you need clarification or additional context, or you want to retrieve related documentation sections.