# Creating Domain Controller - DC01

## General machine info
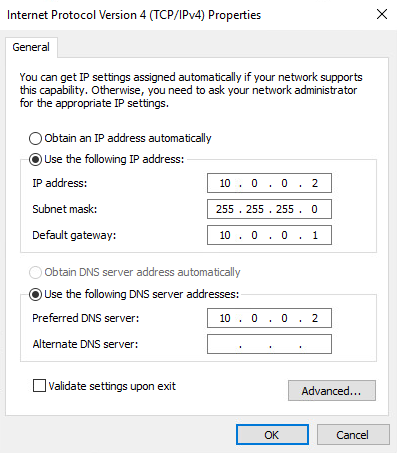
* Machine Name: `DC01`
* IP Adress: `10.0.0.2`
* Subnetmask: `255.255.255.0`
* Gateway: `10.0.0.1`
* DNS: `10.0.0.2`
* Role: Domain Services
* Domain: `bank.local`

## Installation after sysprep

1. Startup the machine.
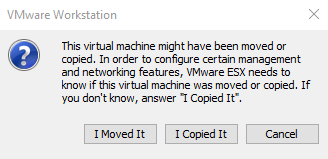
2. When asked if you copied the Virtual Machine, select "I Copied It".

<div align="left"><img src="https://1033393870-files.gitbook.io/~/files/v0/b/gitbook-x-prod.appspot.com/o/spaces%2FPqGbN7FCY7Xh4OkOtvin%2Fuploads%2Fgit-blob-d15be660733010b1d5bdc6ac8929e009751bfd08%2Fafbeelding.png?alt=media" alt=""></div>

3\. Choose the correct settings for your lab, in our example we choose for the region "Netherlands", for app language we choose "English (United States)" and for keyboard layout "United States-International".

<div align="left"><img src="https://1033393870-files.gitbook.io/~/files/v0/b/gitbook-x-prod.appspot.com/o/spaces%2FPqGbN7FCY7Xh4OkOtvin%2Fuploads%2Fgit-blob-db0b1207b88c576821e8901fc34b1fb46b95a98a%2Fafbeelding.png?alt=media" alt=""></div>

4\. Accept the 'License terms'.

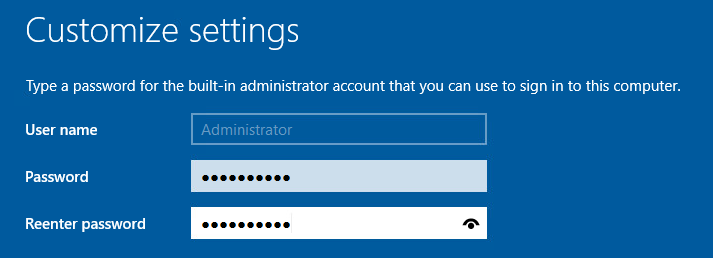
5\. During the initial startup we have to set the `Administrator` password again. We wil use `Welcome01!` for now.

<div align="left"><img src="https://1033393870-files.gitbook.io/~/files/v0/b/gitbook-x-prod.appspot.com/o/spaces%2FPqGbN7FCY7Xh4OkOtvin%2Fuploads%2Fgit-blob-5d9ac192f2f546bdd6fb61a8511a750f10d7c54f%2Fafbeelding.png?alt=media" alt=""></div>

6\. Press CTRL + ALT + DEL and login with the user and password we just set.

## Renaming and setting a static IP

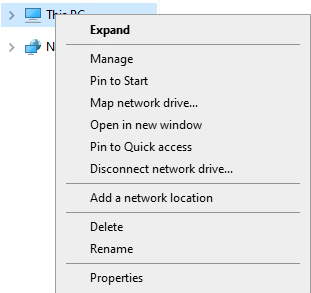
1\. Open File Explorer --> right click "This PC" --> Properties.

<div align="left"><img src="https://1033393870-files.gitbook.io/~/files/v0/b/gitbook-x-prod.appspot.com/o/spaces%2FPqGbN7FCY7Xh4OkOtvin%2Fuploads%2Fgit-blob-878750701574a515e496fadbe1256faf6785c632%2Fafbeelding.png?alt=media" alt=""></div>

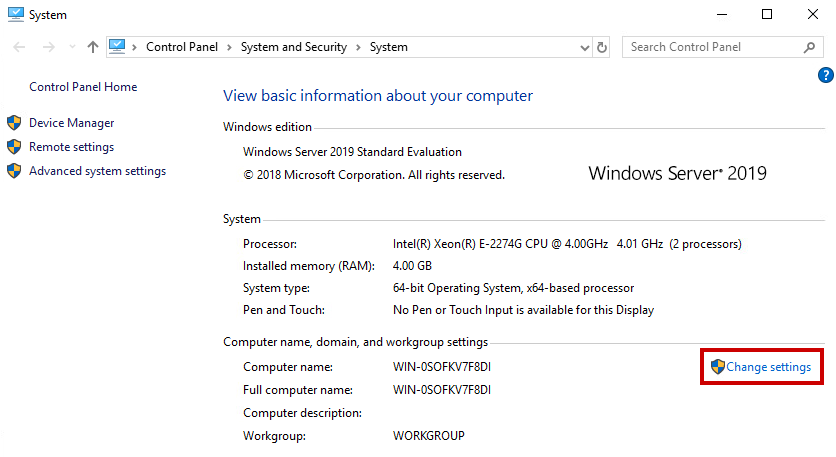
2\. Click on "Change settings"

<div align="left"><img src="https://1033393870-files.gitbook.io/~/files/v0/b/gitbook-x-prod.appspot.com/o/spaces%2FPqGbN7FCY7Xh4OkOtvin%2Fuploads%2Fgit-blob-837119b1f35c5ef347724ca8a2322b2a1415194b%2Fafbeelding.png?alt=media" alt=""></div>

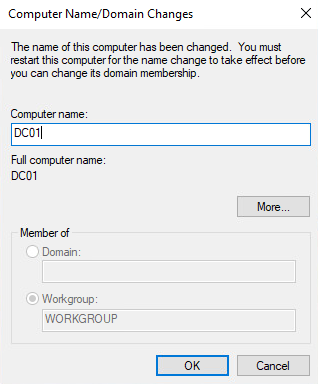
3\. Click "Change" and fill in `DC01` and click OK.

<div align="left"><img src="https://1033393870-files.gitbook.io/~/files/v0/b/gitbook-x-prod.appspot.com/o/spaces%2FPqGbN7FCY7Xh4OkOtvin%2Fuploads%2Fgit-blob-4aed52084a3a5ff255a4ffe0bf0dee4344c1333a%2Fafbeelding.png?alt=media" alt=""></div>

4\. When asked to restart, click on "Restart Now"

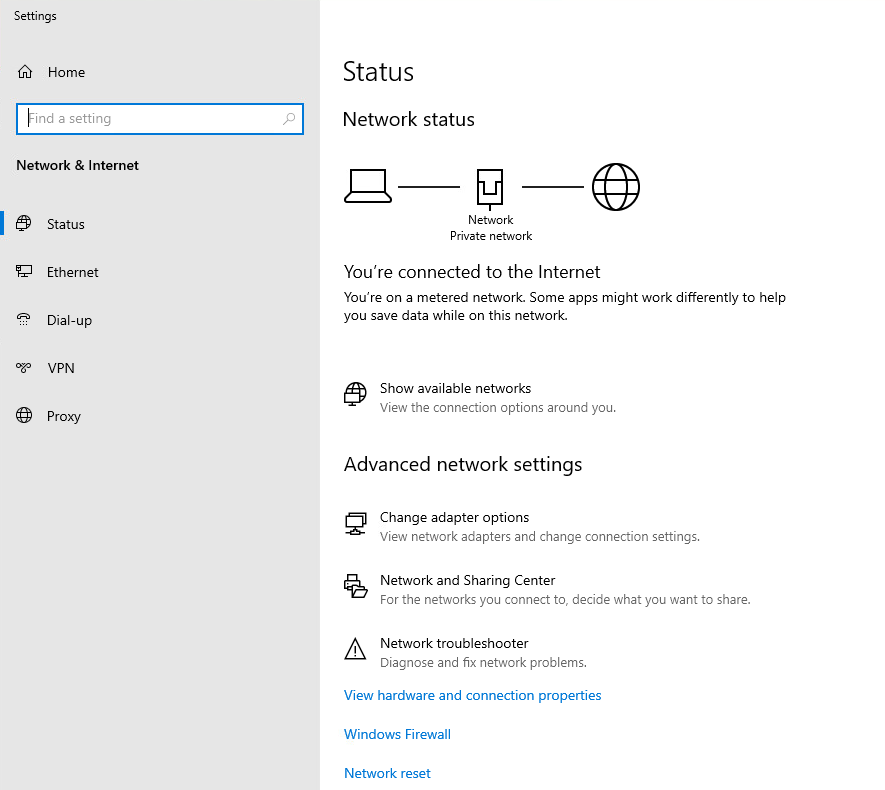
5\. Login again and rightclick in the Taskbar on the Networking Icon and select "Open Network & Internet Settings"

<div align="left"><img src="https://1033393870-files.gitbook.io/~/files/v0/b/gitbook-x-prod.appspot.com/o/spaces%2FPqGbN7FCY7Xh4OkOtvin%2Fuploads%2Fgit-blob-c600b64347c6bbe316b5e4d6fabf5dd8faad79a3%2Fafbeelding%20(109).png?alt=media" alt=""></div>

6\. Click on "Change adapter options"

<div align="left"><img src="https://1033393870-files.gitbook.io/~/files/v0/b/gitbook-x-prod.appspot.com/o/spaces%2FPqGbN7FCY7Xh4OkOtvin%2Fuploads%2Fgit-blob-987d24fef460654159e00bb83e3534438cadd107%2Fafbeelding.png?alt=media" alt=""></div>

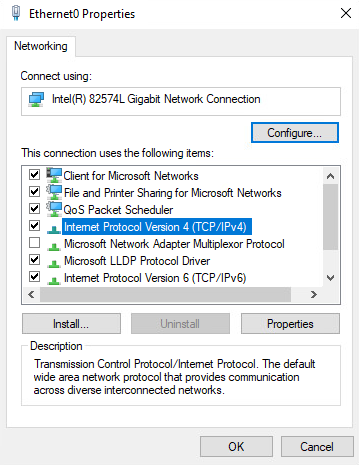
7\. Right click the Ethernet adapter and select "Properties".

<div align="left"><img src="https://1033393870-files.gitbook.io/~/files/v0/b/gitbook-x-prod.appspot.com/o/spaces%2FPqGbN7FCY7Xh4OkOtvin%2Fuploads%2Fgit-blob-7d67253a3c9f09d9ad3cbdd3cd02413ce2dd9a56%2Fafbeelding%20(102)%20(2)%20(2).png?alt=media" alt=""></div>

8\. Select "Internet Protocol Version 4 (TCP/IPv4) and click "Properties"

<div align="left"><img src="https://1033393870-files.gitbook.io/~/files/v0/b/gitbook-x-prod.appspot.com/o/spaces%2FPqGbN7FCY7Xh4OkOtvin%2Fuploads%2Fgit-blob-f1b91eace123954a727586a98c390671f7ef7351%2Fafbeelding.png?alt=media" alt=""></div>

9\. Copy the following settings:

<div align="left"><img src="https://1033393870-files.gitbook.io/~/files/v0/b/gitbook-x-prod.appspot.com/o/spaces%2FPqGbN7FCY7Xh4OkOtvin%2Fuploads%2Fgit-blob-5960c7210c8aff98e64e9c3ebd65bb4b3db90fe9%2Fafbeelding.png?alt=media" alt=""></div>

10\. Click on "OK" and close all the Windows.

## Creating the Domain

### Installing Domain Services

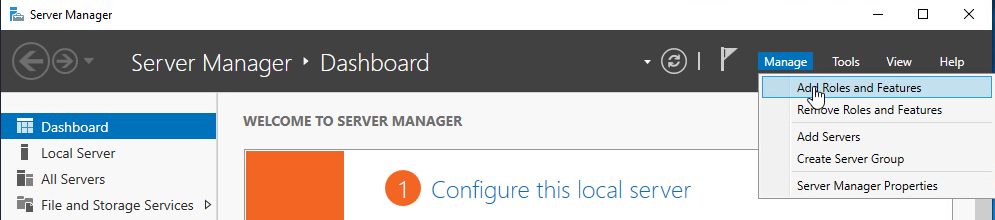
1. Click on start and open the "Server Manager".

<div align="left"><img src="https://1033393870-files.gitbook.io/~/files/v0/b/gitbook-x-prod.appspot.com/o/spaces%2FPqGbN7FCY7Xh4OkOtvin%2Fuploads%2Fgit-blob-f788a2b937bb600592406726a10c1cfb3662aa1f%2Fafbeelding%20(44)%20(2)%20(2).png?alt=media" alt=""></div>

2\. On the right top click on "Manage" and "Add Roles and Features".

<div align="left"><img src="https://1033393870-files.gitbook.io/~/files/v0/b/gitbook-x-prod.appspot.com/o/spaces%2FPqGbN7FCY7Xh4OkOtvin%2Fuploads%2Fgit-blob-8b4c50fab8563bed5db78c47f290d256b40e6f66%2Fafbeelding.png?alt=media" alt=""></div>

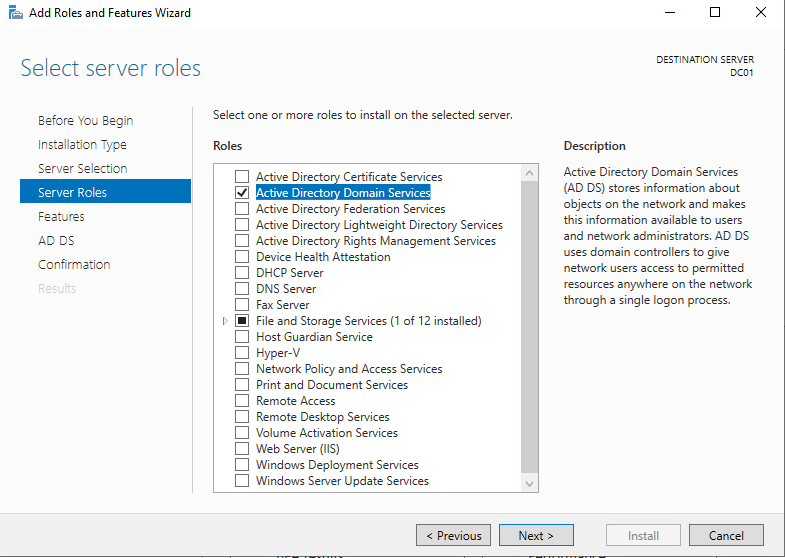
3\. Check the "Skip this page by default" box and click "Next" three times (For the steps "Before You Begin", "Installation Type" and "Server Selection".

4\. At the step "Server Roles" select "Active Directory Domain Services" and click "Next".

<div align="left"><img src="https://1033393870-files.gitbook.io/~/files/v0/b/gitbook-x-prod.appspot.com/o/spaces%2FPqGbN7FCY7Xh4OkOtvin%2Fuploads%2Fgit-blob-c0b5deb8444912e57fd255b670a78dcb22083233%2Fafbeelding.png?alt=media" alt=""></div>

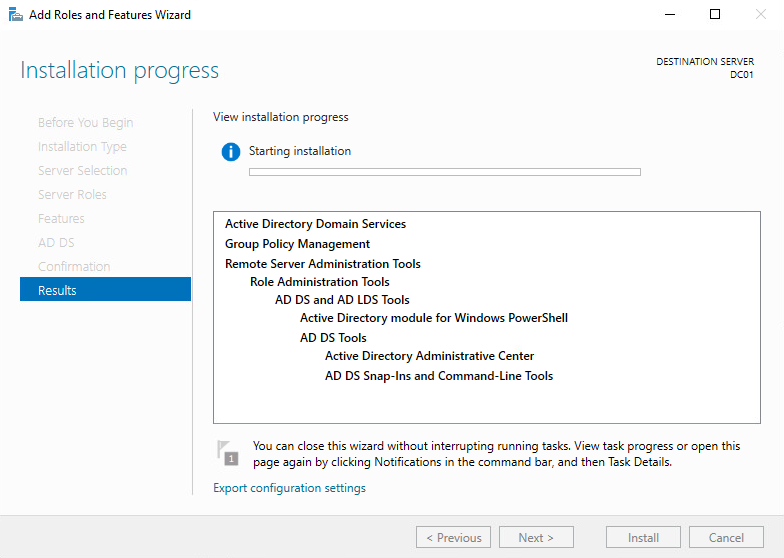
5\. At the steps "Features" and "AD DS" click Next and click Install.

<div align="left"><img src="https://1033393870-files.gitbook.io/~/files/v0/b/gitbook-x-prod.appspot.com/o/spaces%2FPqGbN7FCY7Xh4OkOtvin%2Fuploads%2Fgit-blob-83b333fbdad2b7a12c4c403c940035f6ddd3508f%2Fafbeelding.png?alt=media" alt=""></div>

6\. When the installation finishes close the window.

### Promoting to Domain Controller

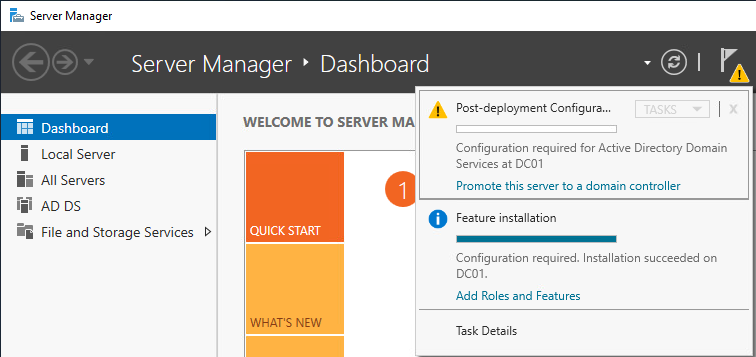
1. In the server manager click on the flag and click on "Promote this server to a domain controller"

<div align="left"><img src="https://1033393870-files.gitbook.io/~/files/v0/b/gitbook-x-prod.appspot.com/o/spaces%2FPqGbN7FCY7Xh4OkOtvin%2Fuploads%2Fgit-blob-ad4063786564c4235e26cd9bfdeb959772fd0e41%2Fafbeelding.png?alt=media" alt=""></div>

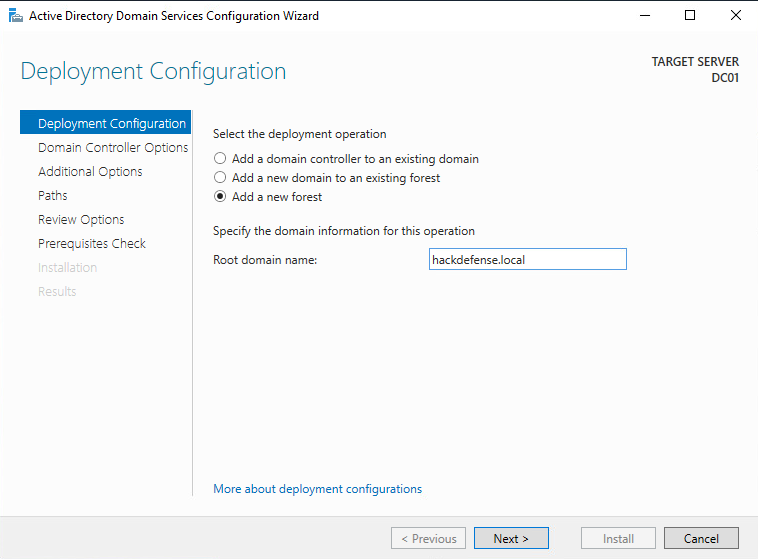
2\. Select "Add a new forest" and choose a domain name.

<div align="left"><img src="https://1033393870-files.gitbook.io/~/files/v0/b/gitbook-x-prod.appspot.com/o/spaces%2FPqGbN7FCY7Xh4OkOtvin%2Fuploads%2Fgit-blob-8cde0c2ddd128179aae380091c8061178da95ff6%2Fafbeelding.png?alt=media" alt=""></div>

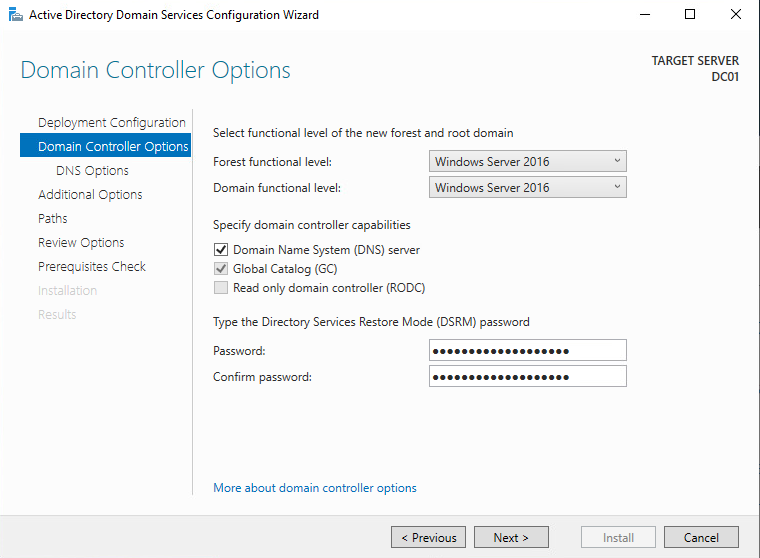
3\. At the step "Domain Controller Options" set a DSRM Password. For this lab we will choose `BankRecoveryKey2022` as password.

<div align="left"><img src="https://1033393870-files.gitbook.io/~/files/v0/b/gitbook-x-prod.appspot.com/o/spaces%2FPqGbN7FCY7Xh4OkOtvin%2Fuploads%2Fgit-blob-9b5e24004e3ce2d14f64d53996ae56926a3432d6%2Fafbeelding.png?alt=media" alt=""></div>

4\. For the steps "DNS Options", "Additional Options", "Paths" and "Review Options" click Next.

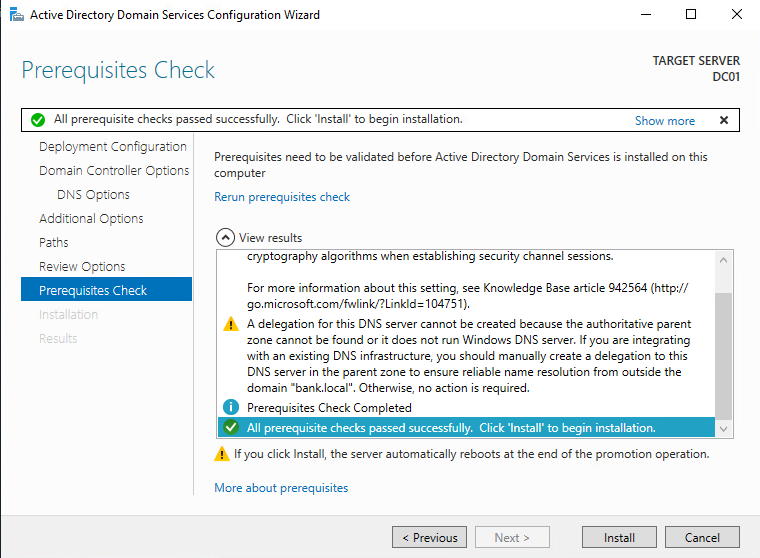
5\. At the step "Prerequisites Check" click "Install".

<div align="left"><img src="https://1033393870-files.gitbook.io/~/files/v0/b/gitbook-x-prod.appspot.com/o/spaces%2FPqGbN7FCY7Xh4OkOtvin%2Fuploads%2Fgit-blob-b51f85cc031938925dd9830a2aa51f93f727de2e%2Fafbeelding.png?alt=media" alt=""></div>

6\. The machine should automatically restart, if not manually restart the machine.

7\. Login with the `Administrator:Welcome01!` credentials set during the installation.

### Creating a Enterprise Admin

### Creating a user

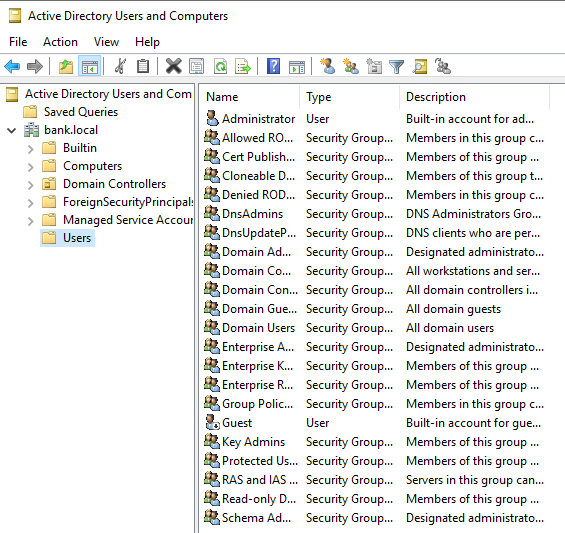
1. Open the "Server Manager", click on "Tools" and then "Active Directory Users and Computers".

<div align="left"><img src="https://1033393870-files.gitbook.io/~/files/v0/b/gitbook-x-prod.appspot.com/o/spaces%2FPqGbN7FCY7Xh4OkOtvin%2Fuploads%2Fgit-blob-d421b127f17eede6c032178891ab7554b051002e%2Fafbeelding%20(52).png?alt=media" alt=""></div>

2\. Extend the directories and click on the folder "Users". All the default users and groups are shown in this folder.

<div align="left"><img src="https://1033393870-files.gitbook.io/~/files/v0/b/gitbook-x-prod.appspot.com/o/spaces%2FPqGbN7FCY7Xh4OkOtvin%2Fuploads%2Fgit-blob-ae13f2ea8896db3aca22a6316861df270b99f2d0%2Fafbeelding.png?alt=media" alt=""></div>

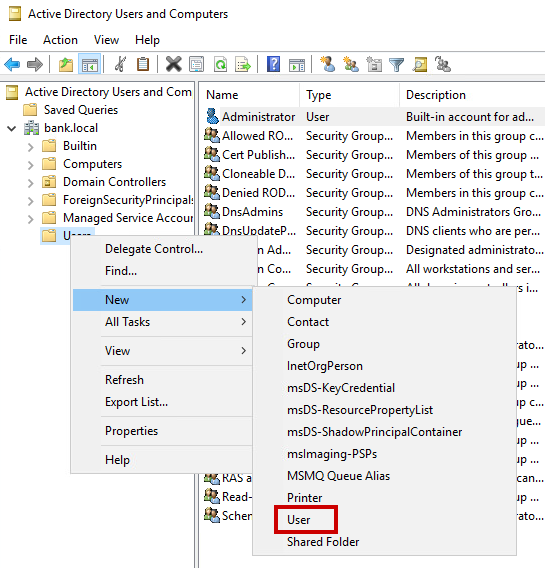
3\. Right click the "Users" directory, go to "New" and click "User"

<div align="left"><img src="https://1033393870-files.gitbook.io/~/files/v0/b/gitbook-x-prod.appspot.com/o/spaces%2FPqGbN7FCY7Xh4OkOtvin%2Fuploads%2Fgit-blob-cf20a46cbe8c30dab18f306fb7b8dee02000ff10%2Fafbeelding.png?alt=media" alt=""></div>

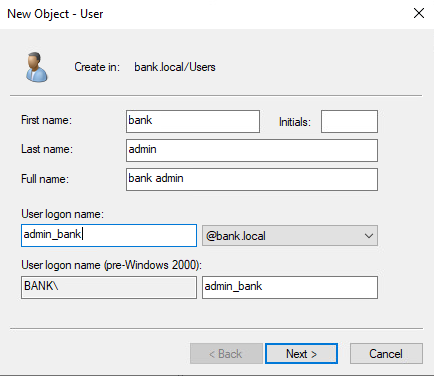
4\. Fill in the following information and click on "Next".

* First name: `bank`
* Last name: `admin`
* User logon name: `admin_bank`

<div align="left"><img src="https://1033393870-files.gitbook.io/~/files/v0/b/gitbook-x-prod.appspot.com/o/spaces%2FPqGbN7FCY7Xh4OkOtvin%2Fuploads%2Fgit-blob-42de249bafdb878265954ce01450e7500d41aeba%2Fafbeelding.png?alt=media" alt=""></div>

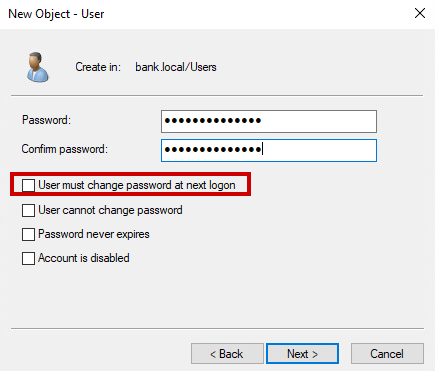
5\. For this user we will set a random password or use `jr8Q3o97@s37AF`. Make sure you save it somewhere, like in a password manager. And uncheck the box "user must change password at next logon"

<div align="left"><img src="https://1033393870-files.gitbook.io/~/files/v0/b/gitbook-x-prod.appspot.com/o/spaces%2FPqGbN7FCY7Xh4OkOtvin%2Fuploads%2Fgit-blob-002aab114e45315799297551a43be9fe3cf263c9%2Fafbeelding.png?alt=media" alt=""></div>

6\. Click "Next" and "Finish"

### Adding the user to the group

1. Right click the user and click on "Add to a group..."

<div align="left"><img src="https://1033393870-files.gitbook.io/~/files/v0/b/gitbook-x-prod.appspot.com/o/spaces%2FPqGbN7FCY7Xh4OkOtvin%2Fuploads%2Fgit-blob-35b8addadd19c88884b378affda51398244f918a%2Fafbeelding.png?alt=media" alt=""></div>

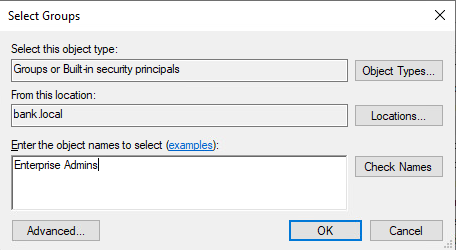
2\. Add the user to the "Enterprise Admins" group by typing the name into the textbox and click on "OK"

<div align="left"><img src="https://1033393870-files.gitbook.io/~/files/v0/b/gitbook-x-prod.appspot.com/o/spaces%2FPqGbN7FCY7Xh4OkOtvin%2Fuploads%2Fgit-blob-83720164ddf00256f2586489b013e6eb00a3b7cc%2Fafbeelding.png?alt=media" alt=""></div>

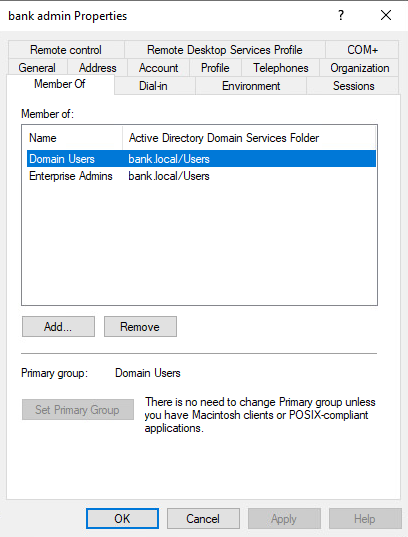
3\. Right click on the user, click "Properties" and go to the "Member Of" tab. The Enterprise Admins groups should be shown there:

<div align="left"><img src="https://1033393870-files.gitbook.io/~/files/v0/b/gitbook-x-prod.appspot.com/o/spaces%2FPqGbN7FCY7Xh4OkOtvin%2Fuploads%2Fgit-blob-906dde67111d050f85dff599712b315cc6ddf82c%2Fafbeelding.png?alt=media" alt=""></div>
